Back in gear

I’ve been a bit busy with work and some house related chores so the build progress has been minimal. I’ve decided to have the steering rack shortened by a shop that does such work and is familiar with the process. That will mean shipping the rack to and from the mainland once I pick the appropriate machine shop.
As of yet, I haven’t found that vendor.
A lot of the build decisions hinges on the placement of the motor, and that will be determined by the placement of the steering rack, so this is a critical step. Once I have it shortened, I’ll be able to create the mount points to attach it to the frame.
Other parts have been trickling in, such as LED tailights from Speedway Motors.
http://www.speedwaymotors.com/1937-Ford-LED-Tail-Light-Assembly,25334.html
1939 Ford taillight Speedway

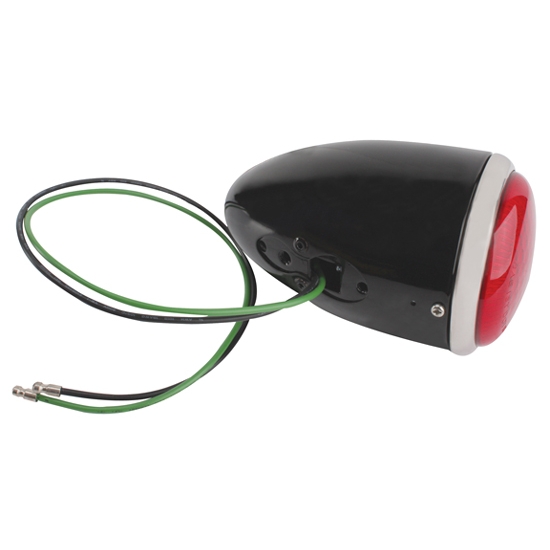
I’m a long way from needing those, but it’s good to get parts once I’ve decided on what I need. Speedway has a huge amount of parts, mostly for racing and American street rods, but there are some useful things for me there as well.

The build progress should pick up a bit as the summer progresses, I have a nicely running Miata to get me to work and I think the Volvo’s issues are resolved. Once the clutch is replaced in the other convertible, all will be good, leaving more build time.

Steering towards the future

I’ve had a bit of a setback, or lack of a setback, depending on how you look at it. The steering rack I had planned to use, a stock Mustang II rack is too long. It can be shortened, but requires some machine work to be done properly, and a lathe is one tool that I don’t have and probably won’t be able for afford or find room for in the near future. Having one custom shortened is a possibility, but at 4 times the cost of the stock rack, which is very common and inexpensive due to its popularity with hot rodders and other builders. The stock steering on the Datsun 620 truck is a steering box with a very low ratio that I didn’t want to live with as well as not having a collapsible column that would be dangerous if not illegal to drive with.
The original steering box connected to two tie rods that ran out to the wheels, Unequal lengths would mean that bump steer would be a bit different for each wheel, but I think that being about on the swing point for the left lower suspension arm it would be negligible and the long distance from the right arm would make is quite small as well.
Looking for alternatives I’ve found two. Hot rods sometimes use a cross steer setup where the rack is single sided and steers the right wheel and there is a tie rod that crosses over and steers the left wheel. This is doable, but that type of special steering rack is almost as expensive as the custom shortened one.
Another choice is to use a different steering box and basically replace the original steering setup with new parts. The Vega box is once such choice that available new. Not as cheap as the Mustang II rack, but half the price of the customized rack.
So the build is stopped for a bit until I nail down the solution to my steering. I hadn’t realized that the lower arms of the Datsun were so close together. Oops.

A great find!

Today I purchased five wire wheels and hubs that I found on Craig’s List. Included were the chrome knock offs. They are 14″ rims from a MGB that have been sitting under the seller’s house for a few years. A bit rusty, but should clean up well. Aside from the difficulty of finding a set of wheels and hubs anywhere for a good price, I was pleased to find these a mile from my house for the sum of $150.
I was going to build the car with the slot style alloy wheels that I have from the Datsun truck donor and switch out to more authentic 19″ wire wheels when I could afford the $2000 plus cost that would entail. Now I can get a somewhat authentic look at a much lower cost. True, the taller wheels would look better, but I plan to drive this daily and so it will be good to have tires that are more easily available. The 165 SR 14 tires on the wheels I just bought should be more easily available, though I may look for taller ones to get a more period look. Either way, I can have a pair of spare wheels and tires on-hand to swap out when necessary.
This web site has excellent information on wheels and tyres, more than you will ever need to know. Ever wonder what all those marks on your tyres mean? He has the answers.
One issue with wire wheels is the fact that they need tubes in the tires. Having tried to find tubes for radial tires before and facing blank stares from all the 19 year old tire jockeys I’ve asked, I almost gave up hope that such things still exist. Yet exist they do and I’ve found an on-line retailer that carries them. Coker Tire has a nice range of historic tires and carries Michelin tubes. I’ll still have to find a garage that has worked with wire wheels and is willing to put in the talc power to keep them from over heating. Balancing wires is another issue as most tire machines don’t have the adapters to do a proper job. Surely someone here is willing or remembers the old days. It certainly won’t be Costco, as much as I like the store for modern things.
Previous to that, I’ll have to get the tires off, so I can get the rims sand blasted and painted. I’ll keep tires on two of them so I can use them for fitting and moving the build around when that time comes.
A lot of work remains to be done, but finding wires locally makes me quite happy since I’m keeping good parts from the steel scrapers, saving money and getting a more authentic look. An even happier fact is that these parts were basically free to me. I took a computer that was given to me that had a failed part, replaced that with another donated part and sold the computer for more than my new wheels and hubs cost. So, I converted computers that would have gone to the scrappers into working machines, found a home for them and got parts that I needed, again keeping them from the scrappers and bringing my project closer to reality. Sweet!

Parts Deux

I’ve been collecting parts from ebay for several weeks now. I keep looking on Craig’s List for more parts locally, but it seems that my fears are well founded, there are few Honda CX650 or CX500 in the islands. I feel lucky to have found my engine at all, and for a good price as well.

My latest purchase arrived yesterday: a pair of carbs complete with intake manifolds. The manifolds were missing from my bike, though the carbs were there. Only a few were listed on ebay and I think their owners considered them to be made of irreplaceabillium. Listed priced for each of the two manifolds needed was for around $175. Ouch. I think there may be issues with the rubber that makes up part of the manifold. Regardless, this pair of carbs had a buy-it-now price of $125. And they are in better shape than the ones I have. I’ll be able to clean them up and make  them look great with the directions I found on the web.

I’m also measuring the frame from the donor Datsun truck that will hold the engine and front suspension all together.  I’d like to have the engine placed back a bit from the stock Datsun location so it give the proper Morgan three wheeler look so I have to see if I can move the sway bar to the rear of the tires instead of the front. This will give the car a more authentic look.

The measurement tools in Photoshop are a help, but I’m still working on creating a CAD layout of the work to be done so I can visualize changes easily. Creating the plans in a CAD program hasn’t been easy however as the User Interface is not what I’m used to. So I’m also getting ready to put pen to paper…. a giant roll of butcher paper purchased at Costco. I did get an A in drafting after all.

Onwards.


The best laid plans

I’ve got a good idea of what the end result should look like and I have a lot of inspiration from various web sites. The JZR Three Wheeler seems to be the closest to what I have in mind. I’d like to purchase a kit, but the purchase price and added shipping are out of my reach. And there’s a legal complication- the folks at the DMV gave me a call and told me that the final product of my labors would allowed on the road and would be classed as a motorcycle. That’s no surprise as most of the Morgan three wheelers seem to be classed as motorcycles.

One surprise is that in Hawaii, apparently motorcycles are not allowed to have seats side by side (Really? no side cars?). This means that my build must be a single seater. And I was told that if I were to buy a JZR frame, I wouldn’t be allowed to modify it at all. However, since I am building my own frame, I’m allowed to make changes to the design when building it. I’m not quite sure how that will work out as I don’t want to narrow the body drastically. The drive shaft will run down the center of the car, and if the width of the frame is narrowed by much, I’d need to straddle the drive shaft and shifter. That just doesn’t make any sense.

At this point, I’d like to develop some CAD plans for the frame and body so that I can do some test adjustments of the body size as well as determine the amount of needed materials. I’m using a Mac and the number of CAD packages available is less than a Windows box, but I’m sure I’ll find one that works. I’ve downloaded FreeCAD and will give it a whirl to see if it’s suitable. It’s also available for Windows and Linux boxes as well, so give it a try.

In the end, I may simply leave the body as close to the stock Morgan as possible and simply not put in a right hand seat. The drive shaft will actually be on the right of center and if I put in an electric reverse as planned, it will be on the drive shaft itself, taking up more room over there.