No, no, don’t touch that, you don’t know where it’s been.

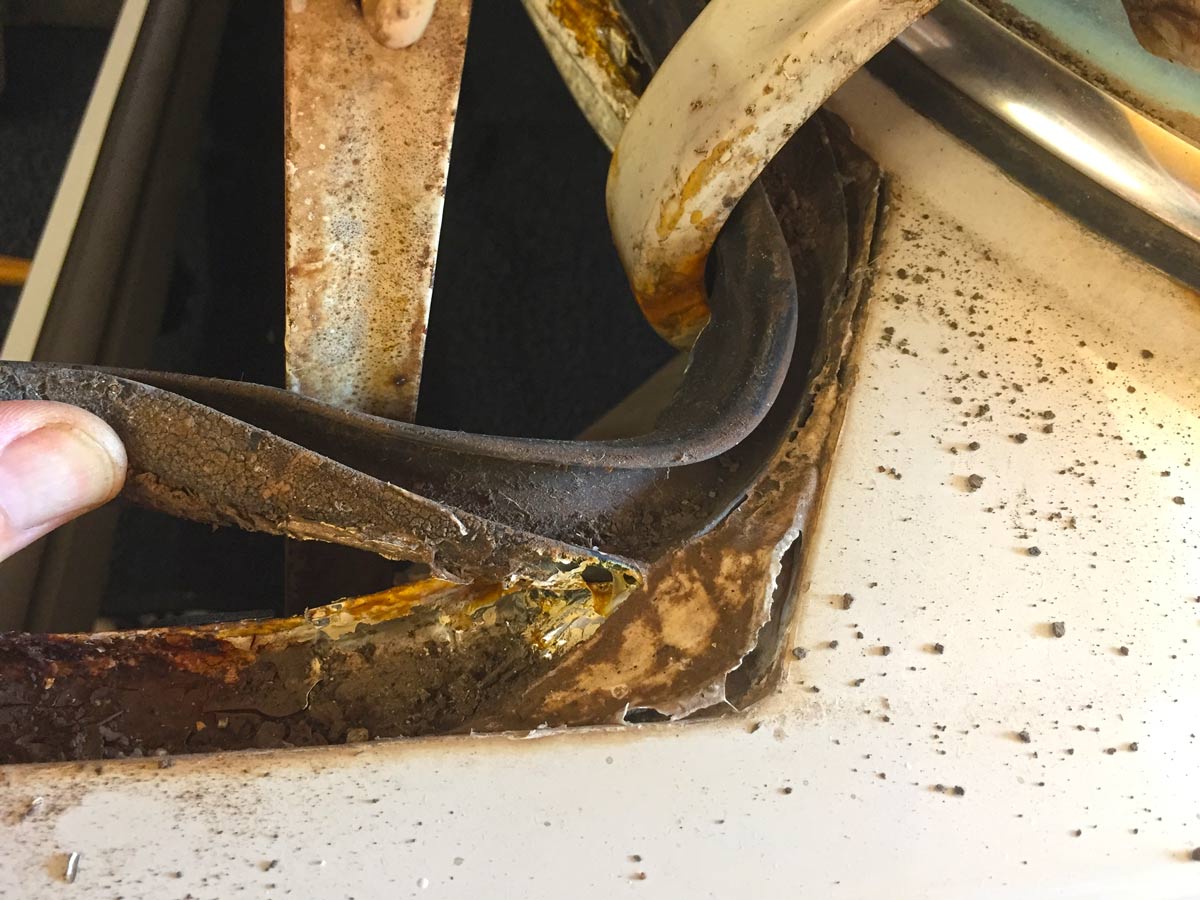
So, I decided to see what lay under the odd silver patch at the edge of the trunk opening. Sure, I knew it had to be a hole of some kind, but I wasn’t prepared for the extent of the issues I discovered. It seems that there had been an extended period of leakage under the old trunk gasket and someone before the guy I bought the car from did a rather low tech patch up.

The present gasket seems to be very recent. It’s smooth and pliable. But it was stuck down to the body with a pretty sizeable film of 3M weatherstrip adhesive. Sloppy as that was, that in itself isn’t much of an issue, but what lay underneath was quite a bit more concerning. There was quite a lot of surface rust under the layer of adhesive so it was obvious there hadn’t been any proper prep of the metal surface before gluing down the gasket. As I pulled up more of the gasket, I began to see a lot of the silver tape like the small bit that was sticking out from under the gasket. Uh oh. The metal tape was stuck down with an adhesive similar to that used in duct tape. I hate duct tape. It either gets hard and brittle or gooey and sticky. This was gooey and sticky. Under the tape in several places they had pop riveted some thin sheets of aluminum over holes in the trunk edge. At the forward edge of the trunk opening, there are several inches where there is no steel remaining, only this built up mess of aluminum, tape and glue.

I haven’t managed to pull it all out yet, but I’ll obviously be fabricating new metal to repair the parts that have been rusted away. The rear window will have to come out first so it won’t happen right away. I thought I knew about all this car’s issues, but nope. I suspect that there are still a few surprises yet to find. Oh well, another opportunity to practice my metal skills, eh?


Hedwig’s restoration has begun!

Well, it’s begun. I needed to move my 2800cs into the garage to clear the driveway for the upcoming carport install and it’s time to start the restoration.

The front carb had a sticking float due to an improperly sized gasket I put in when I rebuilt it, so I removed the carb and corrected the issue. I also lubed up the L bracket in the throttle linkage since it had become stiff during the year-long sit in the driveway. I charged the battery and cleared out the garage. All set.

I knew there was no gas in the lines and so used starter fluid to keep from having to crank for so long to get fuel pulled up to the engine. What I didn’t realize until I looked at the video was the connection for the ground strap at the head was dirty and there was quite a bit of resistance resulting in some smoke. I also didn’t see that once the fuel started flowing, the pump itself started to leak. Eeek. Fortunately, the smoke and fuel didn’t coincide in time and space so there were no flames.

I was going to disconnect the pump and just use the fuel in the carbs to get the car into the garage, but testing it the next day, there was no fuel leak. I suspect that the membrane had shrunk during the long sit with no fuel and it resumed its normal thickness after absorbing some fuel. Either way, I’ll be looking into a new pump. I’ve read that replacement pumps are not satisfactory. Any suggestions on the best option? I didn’t find a conclusive answer in the forum’s posts.
* Now that I’ve thought about it, a more likely source of the leak is the hose on the pressure side of the pump. I looked but didn’t see any leak there when I first shut off the engine, but I will be replacing the hoses as a matter of course so I’ll test for leaks and pump pressure when I begin work on the engine.

Here’s a youtube video of the startup.

https://youtu.be/NERpH4Sqstc

All’s well that ends well. I got it moved into the garage with no issues other than a squealing power steering belt.

The issue with the Pertronix lead being too short was something I only found out when I got the car off the transport truck on its arrival in Austin. The engine mounts are soft and spongey so that might be part of the problem. I’ve only driven the car a few miles in the time I’ve been here as I’ve been on the cusp of starting the restoration for the last 3 years. It would be a simpler failure mode if the wire came off and the car simply wouldn’t run, but in this case, the other wire keeps it at rest on the terminal for the resistor and it will start and then immediately shut down as the torque pulls the wire away from the terminal. So it starts, but won’t run. It’s been 3 years since I faced that failure mode so it took a few more starts than it should for me to remember what was going on.

Yes, I know the valves need to be adjusted. I literally haven’t done anything to this engine except for getting it to run after purchase by adding the Pertronix, cleaning the carbs and changing the fluids. The entire car will come apart now to be cleaned and made better.